

.gif.c5f605483b4c097885dab3cb83d9b8af.gif)
DarkSakul
-
Posts
2,528 -
Joined
-
Last visited
Posts posted by DarkSakul
-
-
Forward: So yes I straight up stole a guide that I didn't write. I will leave a link here to the original thread
https://forums.shoryuken.com/t/rj-45-multi-console-cthulhu-arcade-stick-tutorial-ver-2/97185
This guide also applies to the PS360 Plus, the Brooks Retro Board and various other boards that use RJ45 system cables.
Hopefully if SRK ever goes down again we have an archive of this valuable guideQuote from rtdzign
QuoteI turned this into a pdf. Please download this tutorial here. Copy it, share with your friends, Host it on your website. IDGAF.
PDF version of this tutorial
https://mega.nz/file/FAt2iYSS#gnScCNKxgOSP-subKhSRLDjkmXEa25aZwZfDSyp9QdY(Note from OP), This first post is all about installing RJ45 cables to the MC Cthulhu and installing a RJ45 jack to your stick.
Skip to the second post to see the cable pinouts
Intro
This post is a rewrite of Acceptable Risk?s RJ-45 Tutorial. This was posted to include new info such as recent console support added because the pinouts are spread out in the Cthulhu thread. Also I instead uses a Pass through over a keystone punch down type jack.The MC Cthulhu is a purpose built PCB for hooking up with arcade joystick components. To work with different consoles, you only need to solder wires from a controller extension cable to the appropriate spots. If you look at the top op the pcb there are 3 rows of solder points with columns labled “GABCDEFV”. Each extension cable wire must be soldered on to the appropriate column. When plugged in, the MC Cthulhu PCB can autodectect what system it is plugged into and then make your joystick work for that supported system. Be sure to download the latest firmware to ensure that all of the console cables you make will be compatible.
Originally the MC Cthulhu was able to support 5 consoles using 3 cables, therefore only 3 rows, but now it has grown to include many systems. Because there are 8 columns for system cables a Ethernet jack was a natural fit. The connecter used is typically an RJ-45. If you want to do a dual mod with Xbox 360 pad then you should check out this tutorial. https://forums.shoryuken.com/t/rj-45-mc-cthulhu-imp-xbox-360-dual-mod-tutorial-diagram/92427
Kitty info Update: If you dual modded your stick with a Kitty board, they come preinstalled with a RJ-45 jack. If you connect that to a RJ-45 pass through, then you can use the same cable pinouts for making your own custom cable.
Supplies List:
SpoilerMC Cthulhu
Arcade stick case and buttons.
Soldering Iron and Soldering supplies
Digital Multimeter (Recommended feature: beeping continuity tester)
Wire stripper/cutter
Neutrik or SwitchCraft RJ-45 Jack.
Cat 5 or Cat 6 ethernet cable. For pass through you need a cable with a connector at the end.
Cat 5/6 Crimper and wire cutter/stripper.
Cat 5/6 8P8C crimp on Connectors.
Extension cables for systems you want to use
24mm drill bit (forstner or Holesaw) for mounting hole and drill.
(optional)
Ethernet boots
Neutrik ruggedized boots for use with Neutrik Jack.
Hammer
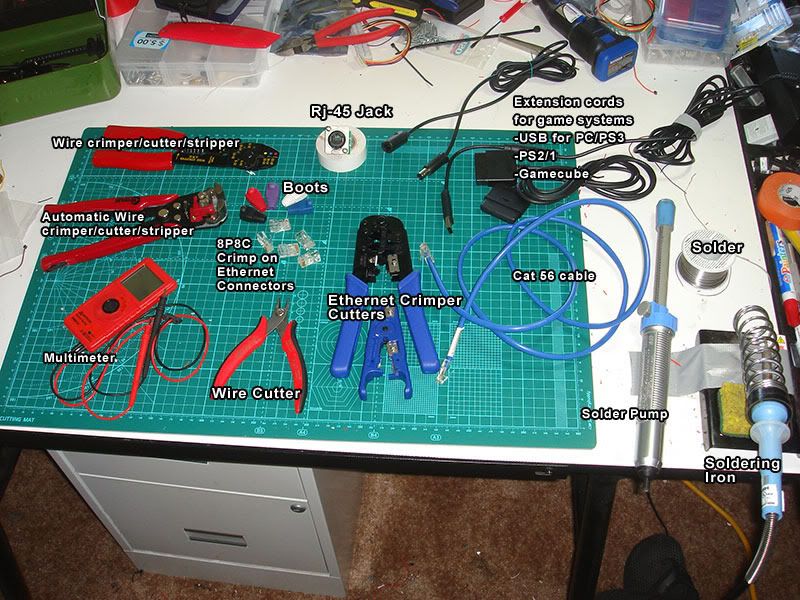
(OP) Original Tutorial Parts 1 and 2, relevant for the MC Cthulhu, but not for system cable making.Spoilerhttp://i730.photobucket.com/albums/ww301/rtdzign/RJ-45 Rewrite ver2/RJ-45_Tools_Supplies.jpg
Part 1: Mounting the RJ-45.**
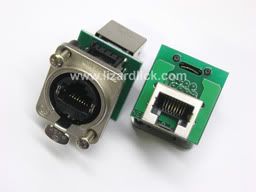
I think it was Robokrikit that first linked the community to these. These are Neutrik RJ-45 panel mount jacks,available at lizardlick.com
http://i730.photobucket.com/albums/ww301/rtdzign/RJ-45 Rewrite ver2/ne8fdp_thumb.jpg
If you have a Plastic arcade stick Like a TE or SE or Hori
You will need to find a suitable place to drill a 24mm hole. 15/16 inches is equivalent to 24mm. Make sure before you drill a hole that you have enough space inside for the internal parts and can plug in the cable to it without obstruction.http://i730.photobucket.com/albums/ww301/rtdzign/RJ-45 Rewrite ver2/Placing-Neutrik-Hole.jpg
Pictured is a Hole Saw and a Forstner bit. A hole Saw is great for plastic and metal, and will work for wood, you will have to clear out the material out of the bit with a screwdriver. Forstners are great for wood an plastic, but do not attempt to cut metal with a forstner bit.
So if you drill a 24mm hole you can then use the mounting plate to drill the 2 mounting holes.
http://i730.photobucket.com/albums/ww301/rtdzign/RJ-45 Rewrite ver2/DrillBits.jpg
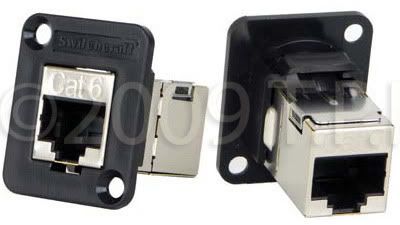
For a wood case it is recommended that you use a switchcraft RJ-45. I think it was Voltech that first used these.
http://i730.photobucket.com/albums/ww301/rtdzign/RJ-45 Rewrite ver2/SwitchCraftRJ-45.jpg
If you must mount the Neutrik in a wood case look to a post below.
Drill free option Update:
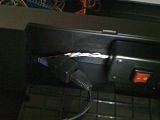
Recently I modded a VLX but this can also be used with a TE or any stick with a cord notch. I didn’t want to drill into my VLX case so Instead I used an Ethernet coupler and hid that away in the cord compartment. I tied a knot in my ethernet cord so that the cord would not be pulled out of the notch used for the default usb cord. For a TE, you would cut off one end of the ethernet cable and then feed it through the hole previously used by the USB cable. After it is through the hole tie a knot in it. With the cut end on the inside you can then solder to the G-V row.
http://i730.photobucket.com/albums/ww301/rtdzign/VLX 360/th_1b827ab6.jpg
http://i730.photobucket.com/albums/ww301/rtdzign/VLX 360/th_2cf280a1.jpg
Part 2: Soldering on the ethernet cable to the MC Cthulhu
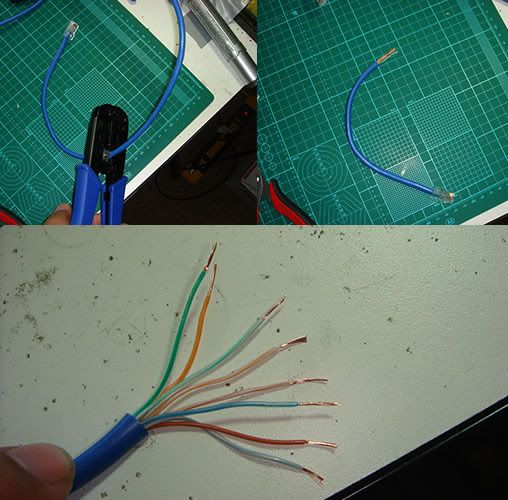
To start you would cut off maybe a foot off a cat5 or cat6 ethernet cable. The length should be long enough to reach where the RJ-45 jack is on your arcade stick. Strip off maybe a inch or two off the outer insulation and untwist the cables.
http://i730.photobucket.com/albums/ww301/rtdzign/RJ-45 Rewrite ver2/CutStripCat5.jpg
You want to use Ethernet Type B layout as most networking cables come in that wiring order. You need to take the 8 wires and strip off 5 mm off the ends and solder them to row 1 using the following diagram. If the are stranded like pictured above then you want to twist and tin each cable end with some solder so it goes in easier. Each of those colored wires corresponds to a letter on the GABCDEFV row.
http://i730.photobucket.com/albums/ww301/rtdzign/RJ-45 Rewrite ver2/WiringEthernetColorsTo_GV_Row.jpg
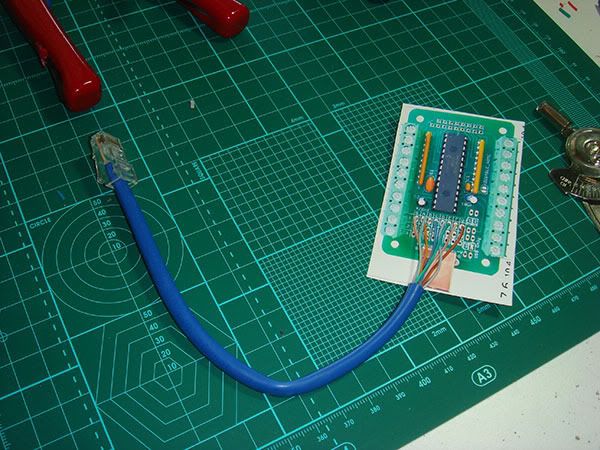
It also helps if you solder on to an actual MC board instead of a picture of the board. (note pictured on the paper is a ps3 cthulhu, which is identical in appearance except for 4 diodes to the right of the G-V rows)
http://i730.photobucket.com/albums/ww301/rtdzign/RJ-45 Rewrite ver2/Cat5eSolderedonBoard.jpg
Now you just plug it into the RJ-45 pass through port.
http://i730.photobucket.com/albums/ww301/rtdzign/RJ-45 Rewrite ver2/PlugIt_intoPort.jpg
-
SEGA
Virtua Stick HSS-0130 (Saturn)
Spoiler
Large 2-player stick mimics the panels found on SEGA Astro City arcade cabinets. Uses the same metal top panels as the actual cabinets.
Parts:
Seimitsu joysticks/SEGA buttons
Known Issues:
None
Mod Difficulty: [ 3 ]
Sega Virtua Stick HSS-0136 (Saturn/PS2)Spoiler
Similar in visual style to the HSS-0130 stick. Mimics Astro City arcade cabinet. Was later re-released for PS2, and an unofficial off-brand version was made for the Dreamcast. Was only sold in Japan.
Parts:
Seimitsu or ASCII joystick/buttons (differs from unit to unit)
Known Issues:Dreamcast variant of the stick has an internal Saturn to Dreamcast PCB that is poorly secured inside. The Adapter’s PCB is wrapped in bubble wrap and stuck on with double sided tape.
Mod Difficulty: [ 3 ]Common ground board.
Sega Virtua Stick HSS-0104 (Saturn)Spoiler
First joystick released for Saturn. Inferior to the HSS-0136. Uses poor quality parts. Only recommended for collectors and not suitable for modding due to limited space.
Parts:
Unknown
Mod Difficulty: [ 5 ]
Virtua Stick High Grade (PS3)Spoiler
High quality joystick with metal body.
Parts:
Sanwa joystick/buttons
Known Issues:
Serious reported issues with First run PCBs.
Mod Difficulty: [ 2 ]
Agetec SEGA Dreamcast Arcade Stick (Dreamcast)Spoiler
Excellent case and one of the better PCBs for Dreamcast controllers. The stick and buttons are below average.
Parts:
Agetec joystick/buttons
Known Issues:
NoneModding Difficulty: [ 5 ]
PCB is common ground. Modding the case to accept modern arcade parts is not easy. Top panel and shell have to be modified to accept 30mm buttons and Seimitsu/Sanwa joysticks.
SNK
Neo Geo AES Stick (Neo Geo/Neo Geo CD)
Spoiler
Standard controller for the Neo Geo AES. Uses a 4 button curved layout and a Seimtsu joystick. Later variants using clone parts were made for the PS2, PS3, PC and Neo Geo X Gold.
Parts:
Seimitsu Stick, proprietary buttons
Known Issues:
Plastic balltop on the joystick can crack with age
Modding Difficulty: [ 5 ]
Limited space can make it difficult to fit standard-sized parts
American/ European Style Sticks
Sticks in this category are meant to be used with American style parts (Suzo/Happ).
X-Arcade Joysticks (PC/Multi)
Spoiler
Come in multiple configurations for one or two players.
Parts:
Happ-like joystick/buttons
Known Issues:PCB not the greatest but there are worse on the market. Compatible with multiple consoles through the use of adapters. Adapters don't always work well.
Mod Difficulty: [ 2 ]
Pelican “Real Arcade” Stick (PS2/GameCube/Xbox)
Spoiler
Parts: Happ-like joystick/buttons
Known Issues:PCBs starting to show problems with age
Mod Difficulty: [ 2 ]
MAS Systems Stick (Multi)Spoiler
Custom made-to-order American-style sticks. Made for various systems.
Parts:Mostly Happ Parts. Newer Models may have Perfect 360° joysticks. Some models support Sanwa buttons.
Known Issues:
Earlier sticks used a custom PCB. Later model sticks ditched the PCB for a hand-wired PIC chip taped down with scotch tape. The most recent models use actual PCBs again.
Mod Difficulty: [ 1 ]
Mortal Kombat Tournament Edition Arcade Stick (PS3, Xbox 360)Spoiler
Has MK-specific layout. Not really useful for playing other games.
Parts:Uses custom Happ parts.
Known Issues:
None
Mod Difficulty: [3.5]Accepts Happ and IL parts. Dual-Mod not possible with stock PCB without some electronic isolation.
NubyTech Official Street Fighter Anniversary Edition Arcade Stick (PS2, Xbox)Spoiler
Parts:
Happ-like joystick/buttons
Known Issues:
None
Mod Difficulty: [ 2 ]Accepts Happ/ IL Parts.
-
Hori
Real Arcade Pro (PS2)
Spoiler
This stick has A and B revisions.
Parts:
Hori joystick/buttons
Known Issues:
None
Mod Difficulty: [2.5]Removing top panel requires bottom panel to be removed first. Issues in mounting Seimitsu joysticks on Version B.
Real Arcade Pro 2 (PS2)
Spoiler
Parts:
Hori joystick/buttons
Sanwa joystick/buttons (SA version)
Seimitsu joystick/buttons (SE version)
Known Issues:
None
Mod Difficulty: [ 2 ]Fighting Stick 3 (PS3) / Fighting Stick EX2 (Xbox 360)
Spoiler
PS3 version has 8 buttons on the front, 360 version has 6. There is a DOA 3 variant of this stick.
Parts:
Hori joystick/buttons
Known Issue:
Reports of the PCB acting up.
Mod Difficulty: [ 3 ]
Fighting Stick Wii (Wii)Spoiler
Parts:
Hori joystick/buttons
Known Issues:
None
Mod Difficulty: [ 3 ]
Real Arcade Pro EX (Xbox 360)Spoiler
Parts:
Sanwa joystick/Hori buttons
Sanwa joystick/buttons (SA version)
Seimitsu joystick/buttons (SE version)
Known Issues:
None
Mod Difficulty: [ 2 ]
Removing top panel requires bottom panel to be removed first. Non-common ground PCB. Buttons can be replaced with Sanwa or Seimitsu buttons easily. Universal stick mount.
Real Arcade Pro 3 (PS3)Spoiler
Parts:
Sanwa joystick/Hori buttons
Sanwa joystick/buttons (SA version)
Seimitsu joystick/buttons (SE version)
Known Issues:
None
Mod Difficulty: [ 2 ]
Removing top panel requires bottom panel to be removed first. Buttons can be replaced with Sanwa or Seimitsu buttons easily.
Wireless Fighting Stick 3 (PS3) / Wireless Fighting Stick EX (Xbox 360)Spoiler
Tekken 6 came bundled with a Tekken-branded variant. PS3 version uses a 2.4GHZ dongle.
Parts:Hori joystick/buttons
Known Issues:Some users report input drops and lag.
Mod Difficulty: [ 3 ]
Fighting Stick V3 (PS3) / Fighting Stick VX (Xbox 360)Spoiler
Parts:
Hori joystick/buttons
Known Issues:
None
Mod Difficulty: [ 2 ]
Common ground PCB. Hori buttons are soldered to a PCB, but the PCB that the buttons are soldered to are not the main PCB but a secondary board that does not need to be saved for button swapping.
Real Arcade Pro.V3 SA (PS3) / Real Arcade Pro.VX SA (Xbox 360)Spoiler
Parts:
Sanwa joystick/buttons
Known Issues:
Cable compartment door can fall off.
Mod Difficulty: [ 2 ]
Common ground PCB. Buttons are connected with quick disconnects.
Real Arcade Pro V4 (PS3/PS4)Spoiler
There are variants of this stick with special silenced parts.
Parts:
Hori Hayabusa joystick/Kuro buttons
Known Issues:Cable compartment door can fall off.
Mod Difficulty: [ 1 ]
Common ground PCB.
Real Arcade Pro Hayabusa (XBO)Spoiler
Parts:Hori Hayabusa joystick/Kuro buttons
Known Issues:Cable compartment door can fall off.
Mod Difficulty: [ 1 ]
Real Arcade PRO V3 VLX (PS3)Spoiler
Also comes in a blue 'Diamond' variant.
Parts:
Sanwa joystick/buttons
Known Issues:
None
Mod Difficulty: [ 1 ]Easy-access top panel.
Real Arcade PRO Premium VLX (PS3/PS4)Spoiler
Parts:
Hori Hayabusa joystick, Hayabusa buttons
Known Issues:
None
Mod Difficulty: [ 1 ]
Easy access top panel.
Hori Real Arcade Pro N (PS3/PS4)Spoiler
Has Gundam, Tekken, Soul Calibur, and Dragon Ball FighterZ variants. Start button can be hidden behind a sliding door.
Parts:
Hori Hayabusa joystick, Hayabusa buttonsKnown Issues:
None
Mod Difficulty: [ 1 ]Common ground PCB.
Hori Fighting Edge (PS4)Spoiler
Premium stick with aluminum finish.
Parts:Hori Hayabusa joystick, Hayabusa buttons
Known Issues:No issues
Mod Difficulty: [ 1 ]Touch panel is a pain to mod, but the board is common ground.
-
There are too many joysticks to list them all -- these are just some of the more important/historically relevant ones.
Mad Catz
NOTE: Issues with early Mad Catz Sticks:
Xbox 360 version: Dual-modding with your TE with a Board for Dual modding, when you open up your stick, printed on the board should be its Revision Version printed on the board. If you have Rev A, that is the problem board. If you have Rev B you will be fine. Rev A = bad, Rev B = okay. I was also under the impression that Rev B boards are more reliable but at this point in time you are better off replacing the PCB.
PS3 Version: Because of the proprietary USB protocol encoding (UHCI) the PS3 versions of the original SE, Round 1 and Round 2 TE Mad Catz sticks, These early PS3 versions has issues operating on PCs with OLDER Non-Intel USB controllers chipsets (USB 1.1 and USB 2.0). The PS3 versions of the TE Round 1 and Round 2 are completely incompatible with USB 3.0 and onwards. Your best bet is to replace the PCB with something more Universally compatible. There no modern USB PCIe board that allows you to use theses sticks, so don't ask us to find you a PCIe expansion board for you. Mod your stick instead.Street Fighter IV SE (PS3, Xbox 360)
Spoiler
A basic 8 button arcade stick controller.
Parts:
MadCatz joystick/buttons (Sanwa clones)
Known issues:
Earlier models may have issues with the PCB or Printed Circuit board.
Mod Difficulty: [ 1 ]
Sanwa parts are perfect drop in replacements and Seimitsu parts would also work well. PCB replacement is do-able because of the space underneath Only replacement art is for the top panel is difficult to replace due to the bent in the angle of the top panel, plexi is not an option here. Tatsunoko vs. Capcom (Wii) and the WWE Brawl SE are nearly identical but they have improved PCB quality.
Tournament Edition "Round 1" (PS3, Xbox 360)
Spoiler
(This stick got retroactively called the Round 1 to distinguish it from the later Round 2 TE)
Type 1, 1st gen TE. Wider layout than the SE, with a leveled flat top. Red IV artwork. This is the TE that had the most issues with the PCB. As with the Xbox 360 versions, they possess a Xbox 360 [2.5 mm audio jack] mic port, the PS3 version lack the mic port. On the PS3 TEs the mic area is filled with a plastic plug.
Parts:
Sanwa joystick/buttons
Known Issues:
Has many issues with the PCB, this was improved with later versions of the TE. Cable compartment can break.
Mod Difficulty: [ 1 ]
Uses standard Sanwa parts so it easy to mod. Plenty of 3rd party options for modding such as replacement panels and side pieces.
Tournament Edition Round 2 (PS3, Xbox 360)
Spoiler
(called the Round 2 on the stock art/retail packaging)
Revision of original TE. Slightly more reliable PCB but still has minor issues.
Parts:
Sanwa joystick/buttons
Known Issues:
Cable compartment door can break.
Mod Difficulty: [ 1 ]
Tournament Edition S (PS3, Xbox 360)
Spoiler
Updated shell with extra screw by the turbo panel. Possesses much better PCB. Uses the "extended size top Panel"
Parts:
Sanwa joystick / buttons
Known Issues:
None
Mod Difficulty: [ 1 ]
TE 2 (Xbox One, Xbox 360, PS3/PS4)
Spoiler
Mad Catz' first entry into the 8th generation of consoles.
Parts:
Sanwa joystick/buttons
Known Issues:
Earlier models have issues with top plexiglass fit.
Mod Difficulty: [ 1 ]
Opening the lid makes the stick easy to access, although the PCB is not common ground on the Xbox One version.
Note: The Xbox One Killer Instinct version of the TE 2 isn't a true Xbox controller and does not work on many games including other fighters. That particular model was originally intended to work only with Killer Instinct (2013).Street Fighter X Tekken Fight Stick Pro (PS3/Xbox 360)
Spoiler
New body style that is wider than the TE series. The Guide area is moved to the right side of the stick. PCB improved over the TE models.
Parts:
Sanwa joystick/buttons
Known Issues:None
Mod Difficulty: [ 1.5 ]Odd PCB placement compared to the TE.
Versus Series (PS3/Xbox 360)
Spoiler
New body style. Easily identified by the screws holding everything together. 2 separate sticks can be joined together into a single 2-player stick.
Parts:
Sanwa joystick/buttons
Known Issues:
None
Mod Difficulty: [ 1 ]
-
Before I start with the cool part of this guide, we will first cover three more important objectives.
And what you need to consider above all else.- Needs
- Wants
- Budget
Needs: This covers what you absolutely have to have, strip down and basic. With any purchase this is what you should think of first. When it comes to Video Game controls this is usually covered by the Default game pad, only a few games require specialized controls or controls modified for those who have special needs. Example a One handed controller for a gamer who only have one useable arm.
I am assuming most people reading this guide now are hardcore fighter or arcade game fans who the regular d-pad is not cutting it for you (for one reason or another).Wants: This is what you have your heart set for. For most people this is your end results.
Budget: This is how much money you have to spend. Budget is the more realistic and sobering part of the purchase process. Typically a stick will run you 60 to 250 dollars U.S and up. retail this figure will change with what the normal market price is in your region of the world. Don't ask me personally where to buy sticks in your home country, I wouldn't know from my location in the US.
Any stick you find** less than $50** is not worth your money and breaks easy.QuoteGeneral rule of thumb on these things: when in doubt, pass. I’d rather pay the few extra dollars and get one that I KNOW works than one that may or may not. My peace of mind is worth a few extra dollars.
Keep in mind if you are broke (Budget), and the default game pad works fine enough for you (Need) that these 2 will and should over ride your Wants.
Now I am also going to cover other features of each stick/ controller here. These factors are also important to cover but goes secondary to the above. I be using this on almost every stick I list here.
- Quality
- Reliability
- Ease of Modification
- Purpose or special use
Difficulty Scale for Modding
From a scale of 1 to 5. This will factor in installing Buttons, Joysticks and replacement panels, and to a lesser extend PCB replacement.
This will not factor actual Dual-mods, replacement art or any painting.- Easy: Standard parts drops right into place, reasonable access to all parts.
- Medium Easy: Still uses standard parts, access can be difficult/ time consuming
- Moderate Difficulty: Requires minor case modding or appropriate mount plates
- Medium hard: Requires some physical tool use to fit parts into place.
- Hard: Requires Heavy modding using tools to cut, grind or drill to fit replacement parts.
How to Win at eBay.
Keep in mind eBay is not an online store. eBay is a listing, and auction service, you are buying from that individual seller not eBay. And Every Seller is different.
For Experienced sellers who sold hundreds if not thousands, Look for sellers with a Feedback score of 99.5% rating or better. Huge time sellers with a 95% or lower are to be avoided like the plague. Pay attention to the text in the negative feedbacks, check to see if the negative feedbacks buyers actually have an issue or they are just jerks.
For people with a hundred sales or less, if they do not have a 100% rating, avoid them.
When Bidding:
- Never, ever bid early. You only drive the price up higher.
- Wait till the last possible minute (or less).
- Also decide in advance the maximum you want to bid, unless you GOTTA HAVE IT do not get in a bidding war.
Also there is no such thing as a “BEGINNER STICK” so do not ask. There are no Training Wheels in the FGC.
-
The “What Stick/Controller Should I Buy?” Thread
Click here to jump to the stick index / reviews
Warning: This thread is heavily opinionated as are the nature of any product review
As well all have contrasting views on what is good/acceptable, as rule from the moderators, we shall not devolve into a VERSUS thread.
Personal opinions are fine, trying to argue that your favorite stick is better will not be tolerated. Do not confuse opinion with fact and vise versa.
Your Results/Mileage will vary. And don’t ask for us to make a choice for you, I am not holding anyone’s hand.When it comes to my own reviews, I will not go through and point out what is my own opinions from what is fact (as my prerogative), and I encourage everyone to do your own fact finding research before you make a final conclusion for yourself. That is what google is for, finding your own research and making your own decisions.
Don't ask about sales, promo codes, or deals for any products. As the time of writing, we don't have any known industry insiders on the forum.
Keep in mind I am purposely leaving out many limited edition and/or collectors sticks, as it goes outside the intentions of the guide. Collectors are going to collect.
And I also like to keep custom sticks off the thread entirely, Custom sticks are outside of the scope of this guide and is considered off topic. Want a custom stick, make your own or hire someone to do it for you. I am going to completely ignore All-button "sticks", Keyboard-"sticks", Hitboxes and the like. If you want to review them, then make your own.
And no this is not a carbon copy of the guide from Tech Talk, as that guide is out of date and I am leaving a lot of old stuff there.
Last but not least I ask readers to go outside of this thread and do your research. Read reviews here on MEGASHOCK and reviews on online stores and in magazines. Weigh the Pros and Cons before deciding which stick to get. And please don't make new threads on what stick you should buy, read the thread first. Don't see what you are looking for ask.- misterBee and Shakunetsu
-
 2
2
-
So I was thinking should I start rewriting and porting over any guides from SRK TT or not.
Not like anything is property of SRK there, its all community developed stuff. -
And people wonder why I am sticking mostly to PC/Switch for the next gen.
I might get PS5, but it be a long ways off. -
- Popular Post
🤣- KimuraLOX, Sonichuman, DangerousJ and 7 others
-
 10
10
-
8 minutes ago, Darc_Requiem said:
Sony's censorship and skipping the Playstation platform.
Oh that shit, yes it's dumb.
-
EX2 was a bitch and a half to mod, and I wouldn't even bother.
V3 is a little better, but that joystick isn't easy to swap.
The Injustice stick was nice to mod, will take Sanwa parts just fine, anything else requires the Dremel. -
9 minutes ago, Darc_Requiem said:
The smaller devs? They didn't even want to go up to PS4.
I don't know the Switch has a flood of (mostly terrible) indie titles (and some gems too).
-
Everyone wants to Bash Bethesda for glitches, but most Elder Scroll glitches that isn't Daggerfall would just result in a broken quest or missing, or duplicated item.
Oblivion, Morrowind or Skyrim don't crash usually unless you are screwing with mods or do something dumb with the command console.
Never had a issue with Fallout 3 or 4. New Vegas is a shit hole of bugs, and the only Fallout Beth didn't make after their acquisition, and Obsidian should stay far far away from Fallout entirely. MS stepping in would only fuck everything up, so don't bother brining it up.
Fallout 76 is the outlier for bugginess. Oh there was the one bug on the PS3 version of Skyrim but it was quickly patched.
Ubisoft on the other hand has glitches that just ether break the game or are hilarious.
EA made a game that would brick your PlayStation 4.
Both EA and Ubisoft has patches ether the same size or bigger than their games. -
-
14 minutes ago, beesuit said:
Das not kawaii
I said nothing about Kawaii. I said thot.
Your level of perversion makes Slaanesh blush -
@beesuit is this Thot enough for you?
It's a two part-er Starts with https://youtu.be/X6-xf19Wr4s And then it goes to another site that not safe for work (dude created a parody of a porn site to sell the joke)
(From the Youtube video description)
Follow the Chaos Gods: https://peepoohub.weebly.com/ Song Starts at ( ͡° ͜ʖ ͡°) -
5 hours ago, misterBee said:
At that point it won't matter too much if you want to go FPGA or emulator for accuracy.
To be honest, it depends how well the code is written for ether one
I like the MiSTer as its one machine going like a dozen or so consoles.
Yeah I could just install RetroArch on my PC and call it a day, but in the end I get more out of FPGA for me.
Now only if they can do Tetris The Grand Master and Tetris the Absolute The Grand Master 2
I found the only emulator that does Tetris right at the moment is a modified MAME built for Shumps, Shump Mame 4. -
1 hour ago, AriesWarlock said:
Free Sonic 2 Steam download
Nice, tip. The Steam site didn't want to work, but my App worked fine.
-
Yeah they are
Ewks BawksPee Essee Phiwe YUGE. -
Let me tell you what I think are the issues with SRK and Evo.
1. The fucking higher end leadership have no fucking clue what they are doing
2. They didn't fire Joey Cuellar outright. They just "remove" him from the event that didn't actually take place.
3. There always been a disconnect between the front page and the forums, they felt like separate entiries, and was treated like it by higher ups.
4. They like to place blame on the forum members.
5. They have zero interest in having a forum but decided to keep it when offers was made to buy the forums off them.
6. Fucking Preppy. What a abusive shit head.
7. Never making attempts to bring in new blood.
- Darc_Requiem and DangerousJ
-
2
-
6 minutes ago, Maxx said:
Oh fuck I need a damn image bucket account again to upload pictures?
No, fuck image bucket.
Use imgur.
-
Facts, the truth has been spoken
-
-
How Remakes should be done


RJ-45 Multi Console Guide
in Tech Talk
Posted · Edited by DarkSakul
System Cables
USB/OG Xbox Cable
USB cables [typically] follow a standard for wire coloring. The ground is always Black, D- is White, D+ is Green and Voltage is Red, For USB you should insert the wire into the Ethernet plug like so. According to this pinout diagram. Original Xbox is done the same way it is a USB with a funny end. On Xbox there is a Yellow cable that is not needed and can be clipped.
Color  Purpose    RJ45 Pin
Black  Ground       1
White  Data -       5
Green  Data +       6
Red    VCC          8
(OP) for the rest of the guide I am leaving out any wire colors, spoiled text will get into detail why rtdzign did this.
I will go into detail about how to figure out the pins on a PS2 cable and using this methodology you can apply this to any system cable. For the PS2 cord we will need to take an extension cord and cut off the female end and strip about half an inch of the large insulation and expose maybe 2 mm of the small wires. Looking at the inside of the controller connector we have the following pins.
http://i730.photobucket.com/albums/ww301/rtdzign/RJ-45%20Rewrite%20ver2/PS2_pinout.jpg 45
Using your mutimeter and your third hand, you need to do a continuity test on each pin to figure out what color wire the pin corresponds to. I usually jot this down. I?ve done maybe 8 different brands of PS2 extension cables and all 8 I think where colored differently so it is best to just do this every time. In other words **Colors between different brands of PS2 extension cords are NEVER the same, even among the same brands at different times in a few cases.**Don’t ever rely on color as to what purpose or pin number the ps2 wires are, only use color as a way to label what is what after you identified what pin it goes to.
http://i730.photobucket.com/albums/ww301/rtdzign/RJ-45%20Rewrite%20ver2/Multimeter.jpg 13
http://i730.photobucket.com/albums/ww301/rtdzign/RJ-45%20Rewrite%20ver2/Psx_pinoutPostIT-1.jpg 12
http://i730.photobucket.com/albums/ww301/rtdzign/RJ-45%20Rewrite%20ver2/Psx_pinoutPostIT.jpg 9
Sometimes instead of using the multimeter, I do it the cave man way. I go outside on some concrete and smash open the cut off female end with a hammer and just line it up to the male end and look at the wire colors that way.
http://i730.photobucket.com/albums/ww301/rtdzign/RJ-45%20Rewrite%20ver2/CavemanWay.jpg 12
Now once I get the pin colors right I refer to the following code and arrange another post it note with how I will insert what color order the wires in the crimp on connector.
From this point on I am leaving out the Photobucket links, use https://pinouts.ru/ if you need to refence the Plugs pinout.
PS1/PS2 Cable
PSX Pin    Purpose    RJ45 Pin    Cthulhu Column
4          Ground       1          G
7          CLK          2          A
2          CMD          3          B
1          DATA         4          C
6          ATT          5          D
                        6          E
9          ACK          7          F
5          VCC          8          V
Gamecube
Gamecube pin    Purpose    RJ45 Pin
3               Ground      1
2               Data        7
1               VCC         8
NES
Purpose -Pin # - Cthulhu Column
GND       1      G
CLK       2      A
LATCH     3      F
DATA      4      C
VCC       7      V
SNES
SNES Pin - MC Cthulhu Column
1          G
4          C
5          F
6          A
7          V
TurboGrafx-16/PC-Engine
The American TurboGrafx-16 uses has a female Din 8 port on the system while the Turbo Duo and all the Japanese systems use a Mini Din 8. I recommend that you buy a number of 6 ft monoprice Mini Din 8 cables. For an TG-16 you can buy a male Din 8 connector and solder that to an ethernet cable.
DIN Pin # - Cthulhu Column
1           V
2           A
3           B
4           C
5           F
6           E
7           D
8           G
Saturn
Pin - Cthulhu Column
1      V
2      B
3      A
4      D
5      E
7      F
8      C
9      G
3DO
3do will currently only work as the only controller, plugged directly into the system; trying to daisy chain off of it or use it through a daisy chain isn’t going to work.
Dsub Pin - Cthulhu column
1           G
2           V
6           F
7           A
9           C
Dreamcast: (no VMU support) MC Cthulhu only works with Arcade stick compatible games (just like the Agetec)
Pinout:
DC Pin - Cthulhu column
1      - F
2      - V
3      - G
4      - B
5      - C